Friday, December 12, 2014

BigMouth-Week #5

Team BigMouth Final Post

The BigMouth is ready to chow! Despite the many bumps in the way, we were able to complete our bench. It took a couple more days than expected, though the extra time was absolutely worth it. I am very proud of my group for their input as well as myself. This was the first public spray painted piece I have ever done, and I feel like it turned out great, which makes me want to do more projects like this in the future.

We were able to stick to the script pretty successfully. A few minor changes were made, such as the tongue size and lip color, though I feel all for the better. Overall great outcome. -Tyler Shirai-Rielly
What a tasteful bench. 


Tuesday, December 9, 2014

Beach Bums - Monty Montgomery

Monty Montgomery, a renown street artist, popped by SDSU to put together a little demo for us. He shared his creative expertise and demonstrated some helpful ways of dealing with over-spray and things of that nature. Pretty much anything that would pose a problem to us novice graphic artists. He was to transform two ordinary benched into masterpieces of geometric abstraction, and he did just that! His mixture of solid black line and color interaction melded perfectly in creating works of art. Whenever I pass by the old administration building, I go out of my way to get a glimpse at them.

Similar to us, his benches were primed and he worked for several days putting the final touches all together. He actually changed locations and relocated to "The Pit" of the art building. There, he didn't have to worry about strong winds, crowds, or excessive heat. I visited him there a few times and took photos and just talked with the guy. He's really cool, down to earth, and definitely knows his stuff.


Monty engaging in lecture and the artistic process

The final products

Friday, November 21, 2014

Team Big Mouth - Week #5


This week was a challenge--we knew we had to pick up the pace if we wanted to finish on time. We had to do a lot of taping and painting, and we had a lot of discussion about the colors and techniques we were going to use. Nonetheless, we figured it all out and finally finished the bench with a little extra time! We are very pleased with the outcome and that all of our hard work paid off.

-Barbara Kinsel

Team Spray Art- Week #5


Spray can stencil video

Finished

Original Bench Design

Now that our grey transition and paint drip background had a few days to dry we were ready to start this week off by painting the spray can and shapes. We started off by painting the background of the can so that while we were laying down the first layer of shapes it would have time to dry. Once the white background of the can was dry we placed the second spray can stencil that would define the can in a black outline. After the can was painted we moved onto stenciling our shapes, which had to be painted in a timely and organized fashion in order to finish the bench on time. To speed the process up we painted our shapes section by section so that while we worked on one section the previous sections would be drying. As a team we were all very pleased with how out bench design turned out. 

- Ian McKelvey

Thursday, November 20, 2014

Team Beach Bums - Week #5


Jackie and Lisel painting the sun tan lotion bottle


We had many templates today, excluding the towels, which were already painted. Mr. Fobes said that the flowers on our bench needed more “variety.” While the paint was drying, we started on the waves. Light blue waves alternated with dark blue waves. Something stuck to the paint, but we got it off with “goo off.” It was hard to make them straight, because the towel had folds in it. Finally, the third towel was laid down. It was less difficult to paint than the other towels, because it only had red and white stripes. After that, we started with the other templates, the starfish and the suntan lotion. The other templates, the sand dollar and the shell, is being worked on by our team.


Mr. Fobes helping out
Ricky and Lisel painting. Jackie and Karissa supporting.


Post by Nathan Henrichon


Wednesday, November 19, 2014

Cruisin' Conquerors - Week #5

For this last week we focused on using the stencils we had created in the earlier weeks. Because last week the team had worked on the background we were all set to spray paint the foreground. We sprayed the three turtles and the two double-layered surf boards on the bottom and the Aztec-patterned border that runs all across the backrest of the bench.


The last week of our bench project actually consisted of three days of spray painting. While we had expected to finish after two days of painting we ran into some difficulties and had to extend our deadline. Because our design was so detailed we were not able to complete it on the last day of spray painting. Thankfully some of the team was able to work on it after class, and we now have a finished bench!

It has been great working on this project. There are some things that we learned as a team that will hopefully help all of us with any upcoming projects.

1. Include enough time for preparation when planning out a timeline to complete a project.
2.Take drying time into consideration.
3. Don't forget that tape gets stickier the longer it is in the sun and it will peel off the paint.

-Vanessa


Team Golden Afternoon - Week #5

With the final week closing up on us, we worked vigorously to layout as many flower designs as we could, while trying to keep the color balance in place. For the first half of the flower there were many problems with over spray due to the Santa Ana winds coming down, but the heat did help with the paints drying faster. For the second half of the flowers we began to experiment and improvise a little to give the flowers more variety and depth in feel. We started to shadow certain flower, other ones we took two stencils and laid them on top of each other before we sprayed to get a new type of flower, and for some we put multiple stencils together in the same hexagon. Once all of the hexagon and flowers were touched up we outlined each hexagon with black paint to make the colors and flowers pop even more. Overall this has been a fun project of working together with classmates and working with spray paints for the first time. 

Sincerely, James Tran

Team Golden Afternoon - Week #4


In week 4 we met by the Faculty Staff Club and some of the students watched Monty spray paint his bench. When people came over and asked what was going on we explained to them about the project and what he was doing. While other students taped off the cement of the bench. The next class period we started off by tracing the hexagons and after that we started spray painting the hexagons with different colors. We had two people working on different sides of the bench so we wouldn't slow each other down which was very helpful because we finished spray painting all the hexagons that day. 

Posted by - Simone Glenn

Team No Limits - Week #5

During the fifth week we completed our bench. We started off by using our stencil to cover where the sun needed to be and painted that section. We then taped off horizontal lines on the planet, then we sprayed stipes accross it. After the paint dried we taped the painted part and sprayed the rest. 
We then added the sun, moon, and spaceship to our design. We completed the project when we outlined everything in black.
It had been a long process, but the results were more than worth it!


-Haley Morrison

No Limits - Week #4


In week 4 we were pretty far along in the painting process.  Painting the planet with the many different colors we used was a lengthy process.  First I taped off the area inside the dimensions of the planet with horizontal strips.  I spaced each stripe randomly(artistically) then we painted each remaining open space randomly with different colors.  We made sure we didn't repeat the same colors too close together.  After doing this process we let the paint dry then repeated the same process until there were no remaining areas with no color inside the planet.

For the chrome stars I quickly made a stencil using the oil board from an already used stencil.  I thought this was a great last minute idea to add more life to the design.

Posted by- Nick Lesmeister

Tuesday, November 18, 2014

Team 8-Bit - Week #5


Week #5, the last week of the project, was all about finishing the bench. We had made good progress in week #4 and although we were much more confident in working with the spray paint it still was a two day job. We had some problems with material which set us back a bit but nothing we couldn't overcome.


The second day we were able to finish the bench. This day was mostly about finishing some out-linings and details. In the end of the day there was even time to put on the first layer of clear coat.

Posted by Kas de Rooij

Saturday, November 15, 2014

Team Big Mouth - Week #4


This week we did a majority of the painting of our bench along with a ton of taping for the future painting!  As you can see in the video we finished the leaves for the back of the open mouth, and the top teeth.  We may have a simple concept but the idea requires precision.  So far we are very pleased with the coloring and the way everything is turning out! Stay tuned for the next weeks' posts with the final product! 

-Amel Nelson

Friday, November 14, 2014

Team Spray Art Week #4


This week we were able to start getting to work with our benches! They were primed and ready to go!
We started by dividing the bench into sections and made sure we were timing the drying process correctly. We were able to work as a team and get the fading effects of the drips just right, along with the ombré effect in the background. Also, working as a team to get the stencils to work just right was a big task for us. Considering we have tons of layers of the shapes through out our process. All in all, this week was a great start to this project and we all can't wait to see the finished products! We love hearing other students stopping by to ask what's going on and showing off some of SDSU's creative perspectives through students.
Here's a short video of our process through out the week!

Posted by Zina Dichoso


Team 8-Bit - Week #4

Bowser's Castle


Our bench was primed and ready for painting and so we worked together spraying each section; making sure to stop the over spray from going everywhere.


It was fun to work as a team to establish quick and easy methods on how to get the task done. Although at times we ended up getting paint on each other rather than the bench, our design still came out pretty much as expected and we will be finishing the last details in the weeks to follow. Each part took time and planning but I believe that it will all be worth it in the end.

Will the princess be at this castle?

Posted by Nicholas John Howard

Team Beach Bums - Week #4

This week we had a guest artist come and spray paint two benches on the SDSU campus.  Monty Montgomery spent three days on campus giving us valuable tips for our own bench designs.  He advised us on what tape to use, how to avoid over spray, and the most effective way to spray paint.  We also got to view pictures of his most recent project, which resembled the same style he was painting the benches at SDSU.  The benches he painted relied on color interaction and bold outlines, very similar to our own design.  We were able to watch a professional create a beautiful, public piece of art and aspire to follow in his footsteps.  Having Monty at our school was an inspiration for our own benches and allowed any passerby to view the current work of the art students.

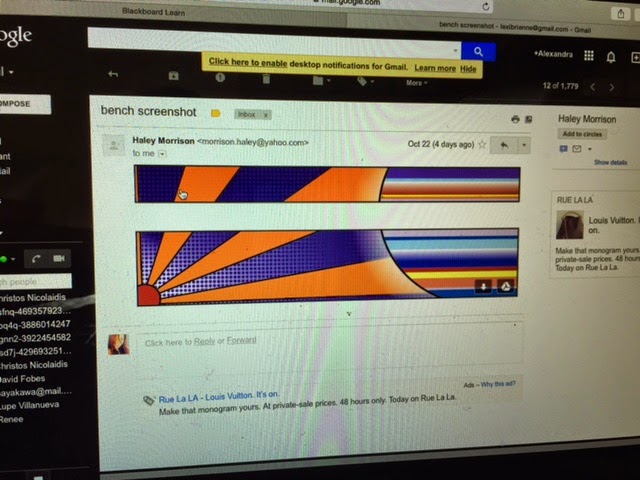
Top: Monty working on one of the benches
Bottom: the finished bench designs


Here is a video of Monty spray painting

In addition, our group began priming our bench for painting.  We all collaborated to paint the bench with white primer as to enhance the spray paint colors and get a smooth coat of paint.  We came back two days later to begin spray-painting the first layers of our design.  We had to work with the weather, as it was hot and windy, blowing the spray paint around us.  We rotated which side of the bench we worked on because we needed multiple coats of each color for an even layer.  Spray painting even coats were harder than expected, but our team gave pointers and was supportive of one another as we all learned how to work a spray can.  This bench project has been a unique and great experience because we are creating a lasting piece of public art.  We are all grateful for this opportunity and proud that we will be able to point out which bench is ours to fellow students.

Team Beach Bums beginning to spray paint our bench
Top Left: Ricky and Lisel painting stripes,
 Top Right: Karissa spraying flowers,
Bottom: Jackie spraying waves


Here is a video of Team Beach Bums spray painting our bench

-Karissa Rhoads


Team Cruisin' Conquerors - Week #4

This week we finally got our first taste of the bench project as reality. During this week, the long awaited Monty demonstrated how he works. We learned a lot through observation and questions. He first established his credibility by discussing, and showing us his last project—a massive, abstract mural painted on an old brick wall. His project focused on line work and color interaction; he will be using the same style for his bench. Monty does not work by recreating a draft, rather, he works with a rough idea and artistic instinct. For color choice, Monty chooses colors found in the environment surrounding the piece. As for technique, he showed us the various types of tapes and their uses. We also learned how to efficiently control overspray through utilizing different types of cardboard, rather than waste tape. We went to an extra level of protection from overspray by wrapping the the cement blocks in plastic and blue tape.

Monty demonstrating his techniques with spray paint (top) Wrapping our bench in plastic (bottom)
We finally began painting our bench the second half of the week. This mostly consisted of planning and spacing—the most important part. We had difficulty in conceptualizing the different layers and ordering of them, especially since we planned to incorporate the original color of the bench. By the end of the day we managed to lay out our design, paint over with our base color, spray the white border lines on the bottom, create the striped background behind the sun, and spray the main sun. The main sun is a good example of experimentation and creating the project as you go. Originally, two flat colors were superimposed on one another; we made the fill color into a gradient. We felt it made for a more aesthetically interesting design choice. 

Taping over the original bench to preserve the same color stripes and our altered sun design


Here we are spraying the first layer of the sun on top of a white primer coat. This layer will end up being only an outline after the second, smaller sun is sprayed on top of it. As seen in the video, we came across a difficulty: underspray. This was caused by the loss of adhesive as well as weakening of the skinnier parts of the stencil. We solved this issue by changing the fill color to a gradient so the underspray would blend in.


-Kiana Moy

Monday, November 10, 2014

Week #3 Blog Team No Limits

Throughout the third week of the bench project, our team worked on and completed preparing our templates in order to make sure our overall design came out correctly. We created and cut out stencils for a couple specific parts of the design such as the sun, the planet's moon, the spaceship, and the benday dots. These stencils were cut out based on this design that our team created in illustrator. We were also asked to put a list of ten colors together which would be used throughout the final masterpiece.


We then took each template outside to practice using the spray paints so we could become more familiar with how the spray cans worked. We figured out that the design came out smoother when we sprayed at a direct angle and held the template all the way down. 


The templates were completed, and the designs were demonstrated and ready for a visual presentation. The actual designs that we had practiced with were pinned to the classroom wall 
right next to our presentation board so that everything was clearly laid out.